AI Governance: Extending Coverage with Jamf Extender
What is AI Governance?
AI Governance closes the gap between "we allowed AI" and "we can prove it's configured correctly across the fleet." Offered through Jamf for Mac, it gives IT and security teams two integrated capabilities: AI Visibility provides near real-time inventory of what AI tools are running, what they're doing, and what they're connecting to. AI Policies translates each AI tool's enterprise controls into plain-language choices and delivers them as OS-enforced managed settings. Together, they answer the three questions auditors and leadership ask: what's running, is it configured right, and can you prove it.
Learn more about AI Governance
What Jamf Extender Adds
Windows Policy Export: Download AI governance policies as ready-to-deploy bundles for upload to any MDM or UEM solution, making it easy to enforce AI tool configurations on Windows endpoints alongside your macOS and mobile fleet.
Real-time Block Status Visibility: See at a glance which AI tools are already blocked before you deploy. Green status indicators show current coverage, helping you avoid unneccessary work and understand your enforcement posture instantly.
Streamlined Deployment Workflow: Deploy Custom Prevent Lists (endpoint controls) and domain blocks (network controls) to Jamf's security tooling directly from the AI Visibility dashboard, no context switching between portals or manual list creation required.
Automatic Duplicate Detection: The extension intelligently skips signing IDs and domains that are already blocked, giving you a clean deployment summary and preventing unnecessary duplicate entries.
Cross-Portal Orchestration: Jamf Extender automatically routes deployments to the correct Jamf Cloud portals based on your Jamf Extender Portal Group configuration, eliminating manual lookups and configuration errors.
Contents
Who Benefits Most:
Organizations managing multiple environments (production, staging, dev) or those who frequently adjust AI governance policies will appreciate the visibility and deployment speed. Teams that want real-time confirmation of their enforcement posture across Jamf security tools will find the integrated status indicators particularly valuable.
Overview
This guide shows you how to use Jamf Extender across AI Governance in Jamf Account. Jamf Extender adds capabilities to the AI Visibility dashboard to view AI tool usage, deploy additional endpoint and network blocks for identified AI tools in your environment. Jamf Extender also adds a download option directly in the AI Policies builder, letting you export any policy as a ready-to-deploy bundle for Windows endpoints, via upload to your MDM or UEM of choice.
What You'll Accomplish:
- View AI tool usage in Jamf Account AI Visibility
- Deploy Custom Prevent Lists (Jamf Protect) and Custom Domain Blocks (Security Cloud)
- Verify and manage AI governance blocks
- (Optional) Deploy AI Governance policy configuration to Windows endpoints
Time Required: 2-5 minutes per deployment
Prerequisites
✅ Jamf Extender installed and configured (see Jamf Extender Setup below)
✅ Portal Groups configured linking Jamf Pro to Protect and/or Security Cloud
✅ Admin access to:
- Jamf Account AI Governance
- Jamf Protect instance (with write permissions for Custom Prevent Lists)
- Jamf Security Cloud instance (optional, for domain blocking)
Jamf Extender Setup
Overview
This guide walks you through setting up Jamf Extender after installation, including configuring API credentials and linking your Jamf systems together using Portal Groups.
What You'll Accomplish:
- Configure API credentials for Jamf Pro, Jamf Protect, and Jamf Security Cloud
- Link these systems together using Portal Groups
- Enable cross-platform device lookups and deployments
Time Required: 5-10 minutes for initial setup
Setup Prerequisites
✅ Jamf Extender installed in your browser (Chrome, Safari, Edge, or Firefox)
✅ Admin access to:
- Jamf Pro instance
- Jamf Protect instance
- Jamf Security Cloud instance
✅ Permissions needed:
- Jamf Pro: Ability to create API roles and clients
- Jamf Protect: Admin role (NOT read-only) to create Custom Prevent Lists. The role can be limited to just writing Prevent Lists.
- Jamf Security Cloud: Admin credentials
Part A: Initial Extension Setup
After installing Jamf Extender, you'll see:
- Browser toolbar: Jamf Extender icon (click to open popup)
- Jamf Pro pages: Status pill appears next to the Jamf logo
- Jamf Pro sidebar: "Jamf Extender" button above "Resource Center"
Initial Status: The status pill will show yellow "Configure Extension" until you set up credentials.
Part B: Configure Jamf Pro Credentials
You have two options: Quick Setup (Recommended) or Manual Setup.
Automatic Setup (Recommended)
Automatic Setup creates an API role and client with the correct permissions.
- Navigate to your Jamf Pro instance and log in
- Click Jamf Extender in the left hand menu below Settings
- Click "Set Up Automatically" in the Configuration section
- Wait for confirmation (usually 5-10 seconds)
- Refresh the webpage
- Done! The status pill turns green "Extension Active"
What Automatic Setup Does:
- Creates an API role named "Jamf Extender"
- Grants all required read permissions (computers, policies, profiles, groups, etc.)
- Grants write permissions for Categories and Packages (delete unused)
- Creates an API client assigned to that role
- Stores credentials securely (macOS Keychain on Mac with the Jamf Extender app installed, browser storage otherwise)
Troubleshooting Quick Setup:
- ❌ "Failed to create API client" → Check that your Jamf Pro user has permission to create API roles/clients
- ❌ "Network error" → Verify you're logged into Jamf Pro and the page has loaded fully
Part C: Configure Jamf Protect Credentials
⚠️ CRITICAL: You need a WRITE-CAPABLE Protect API client (not read-only) to deploy Custom Prevent Lists.
Set Up Automatically (Recommended)
- Navigate to your Jamf Protect instance (e.g.,
tenant.protect.jamfcloud.com) and log in - Click the Jamf Extender icon in your browser toolbar
- The Jamf Protect section appears showing your detected instance under Configuration
- (Optional) Change the Client Name if desired
- Click "Set Up Automatically"
- Copy and save the Client ID and Password (shown once) to a password manager
⚠️ Important: The auto-created client has read-only permissions by default. For AI Visibility deployments, you need write access.
Once you have created the initial API Client above:
Option A: Grant Full Admin
- Navigate to Administrative → API Clients and select the newly created API Client
- Click Edit and add the Full Admin role using the Roles dropdown menu
- (Optional) Remove the Read Only role by clicking the X in the label
Option B: Add Proper Write Permissions
- Navigate to Administrative → Account → Roles and select +Create Role
- Name the new API Client (example: Prevent List Creation)
- Uncheck the box at the top of the Write column to deselect all permissions
- Check the box for Prevent Lists under the Write Column
- Navigate to Administrative → API Clients and select the newly created API Client
- Click Edit and add the new limited role you created using the Roles dropdown menu
- (Optional) Remove the Read Only role by clicking the X in the label
What This Does:
- Creates an API client via Protect's GraphQL API
- Uses the Auth0 JWT captured from your browser session
- Stores credentials per origin (e.g.,
protect_creds:https://overview.protect.jamfcloud.com)
Part D: Configure Jamf Security Cloud Credentials
Manual Setup
In Security Cloud:
- Copy your customerId value from the domain - example: https://radar.wandera.com/dashboard?customerId=1a2s3d4f5g6h7j8k9l0
- Navigate to Integrations → Risk API in the left hand menu
- Click Generate API key
- Give the API Key a name
- Copy and save the Application ID and Secret (shown once) to a password manager
In Jamf Extender
- Click the Jamf Extender Toolbar icon
- Within the Configuration section, expand the Manual section
- Select Add new... in the first dropdown under Portals
- Select Security Cloud under Type
- Paste your customerId into the Customer ID field
- Paste your Application ID into the Client ID field
- Paste your Application Secret into the Client Secret field
- Enter your Admin Email and Password that you use to login to Security Cloud
Part E: Create Portal Groups (Link Systems Together)
Portal Groups link your Jamf Pro instance to Protect and/or Security Cloud, enabling cross-platform device lookups and deployments.
Create a Portal Group
- Click the Jamf Extender toolbar icon
- Scroll to "Portal Groups" section
- Click "Add Group"
- Configure:
- Group Name: Descriptive name (e.g., "Production" or "Dev Environment")
- Jamf Pro Instance: Select from dropdown (must be configured first)
- Security Cloud Customer ID: (Optional) Select if deploying domain blocks
- Jamf Protect Instance: (Optional) Select if deploying Prevent Lists
- ⚠️ One Protect or Security Cloud is required for a Portal Group
- Click "Add Group"
Example Portal Group:
Name: Production Environment
Jamf Pro: https://myorg.jamfcloud.com
Security Cloud: Customer ID 12345
Jamf Protect: https://overview.protect.jamfcloud.com
Why Portal Groups Matter:
- The extension auto-detects which Protect/Security Cloud instance to deploy to
- Device detail pages in Jamf Pro show cross-platform data (vulnerabilities, threats, etc.)
- AI Visibility deployments route to the correct systems automatically
Part 1: AI Visibility Dashboard & Deployment
Now the fun part! Deploy AI governance blocks from Jamf Account.
Access AI Visibility
- Navigate to Jamf Account:
account.jamf.com - Log in with your Jamf credentials
- Go to: AI Governance → AI Visibility
- Select your environment (if you manage multiple)
What You'll See:
- "N unique products in use" count
- Product cards for each AI tool detected (e.g., Claude, Cursor, ChatGPT)
- Each card shows:
- Product name and bundle ID
- Launchers (signing IDs for the main app)
- Commands (signing IDs for helper processes)
- Event counts over the selected time window
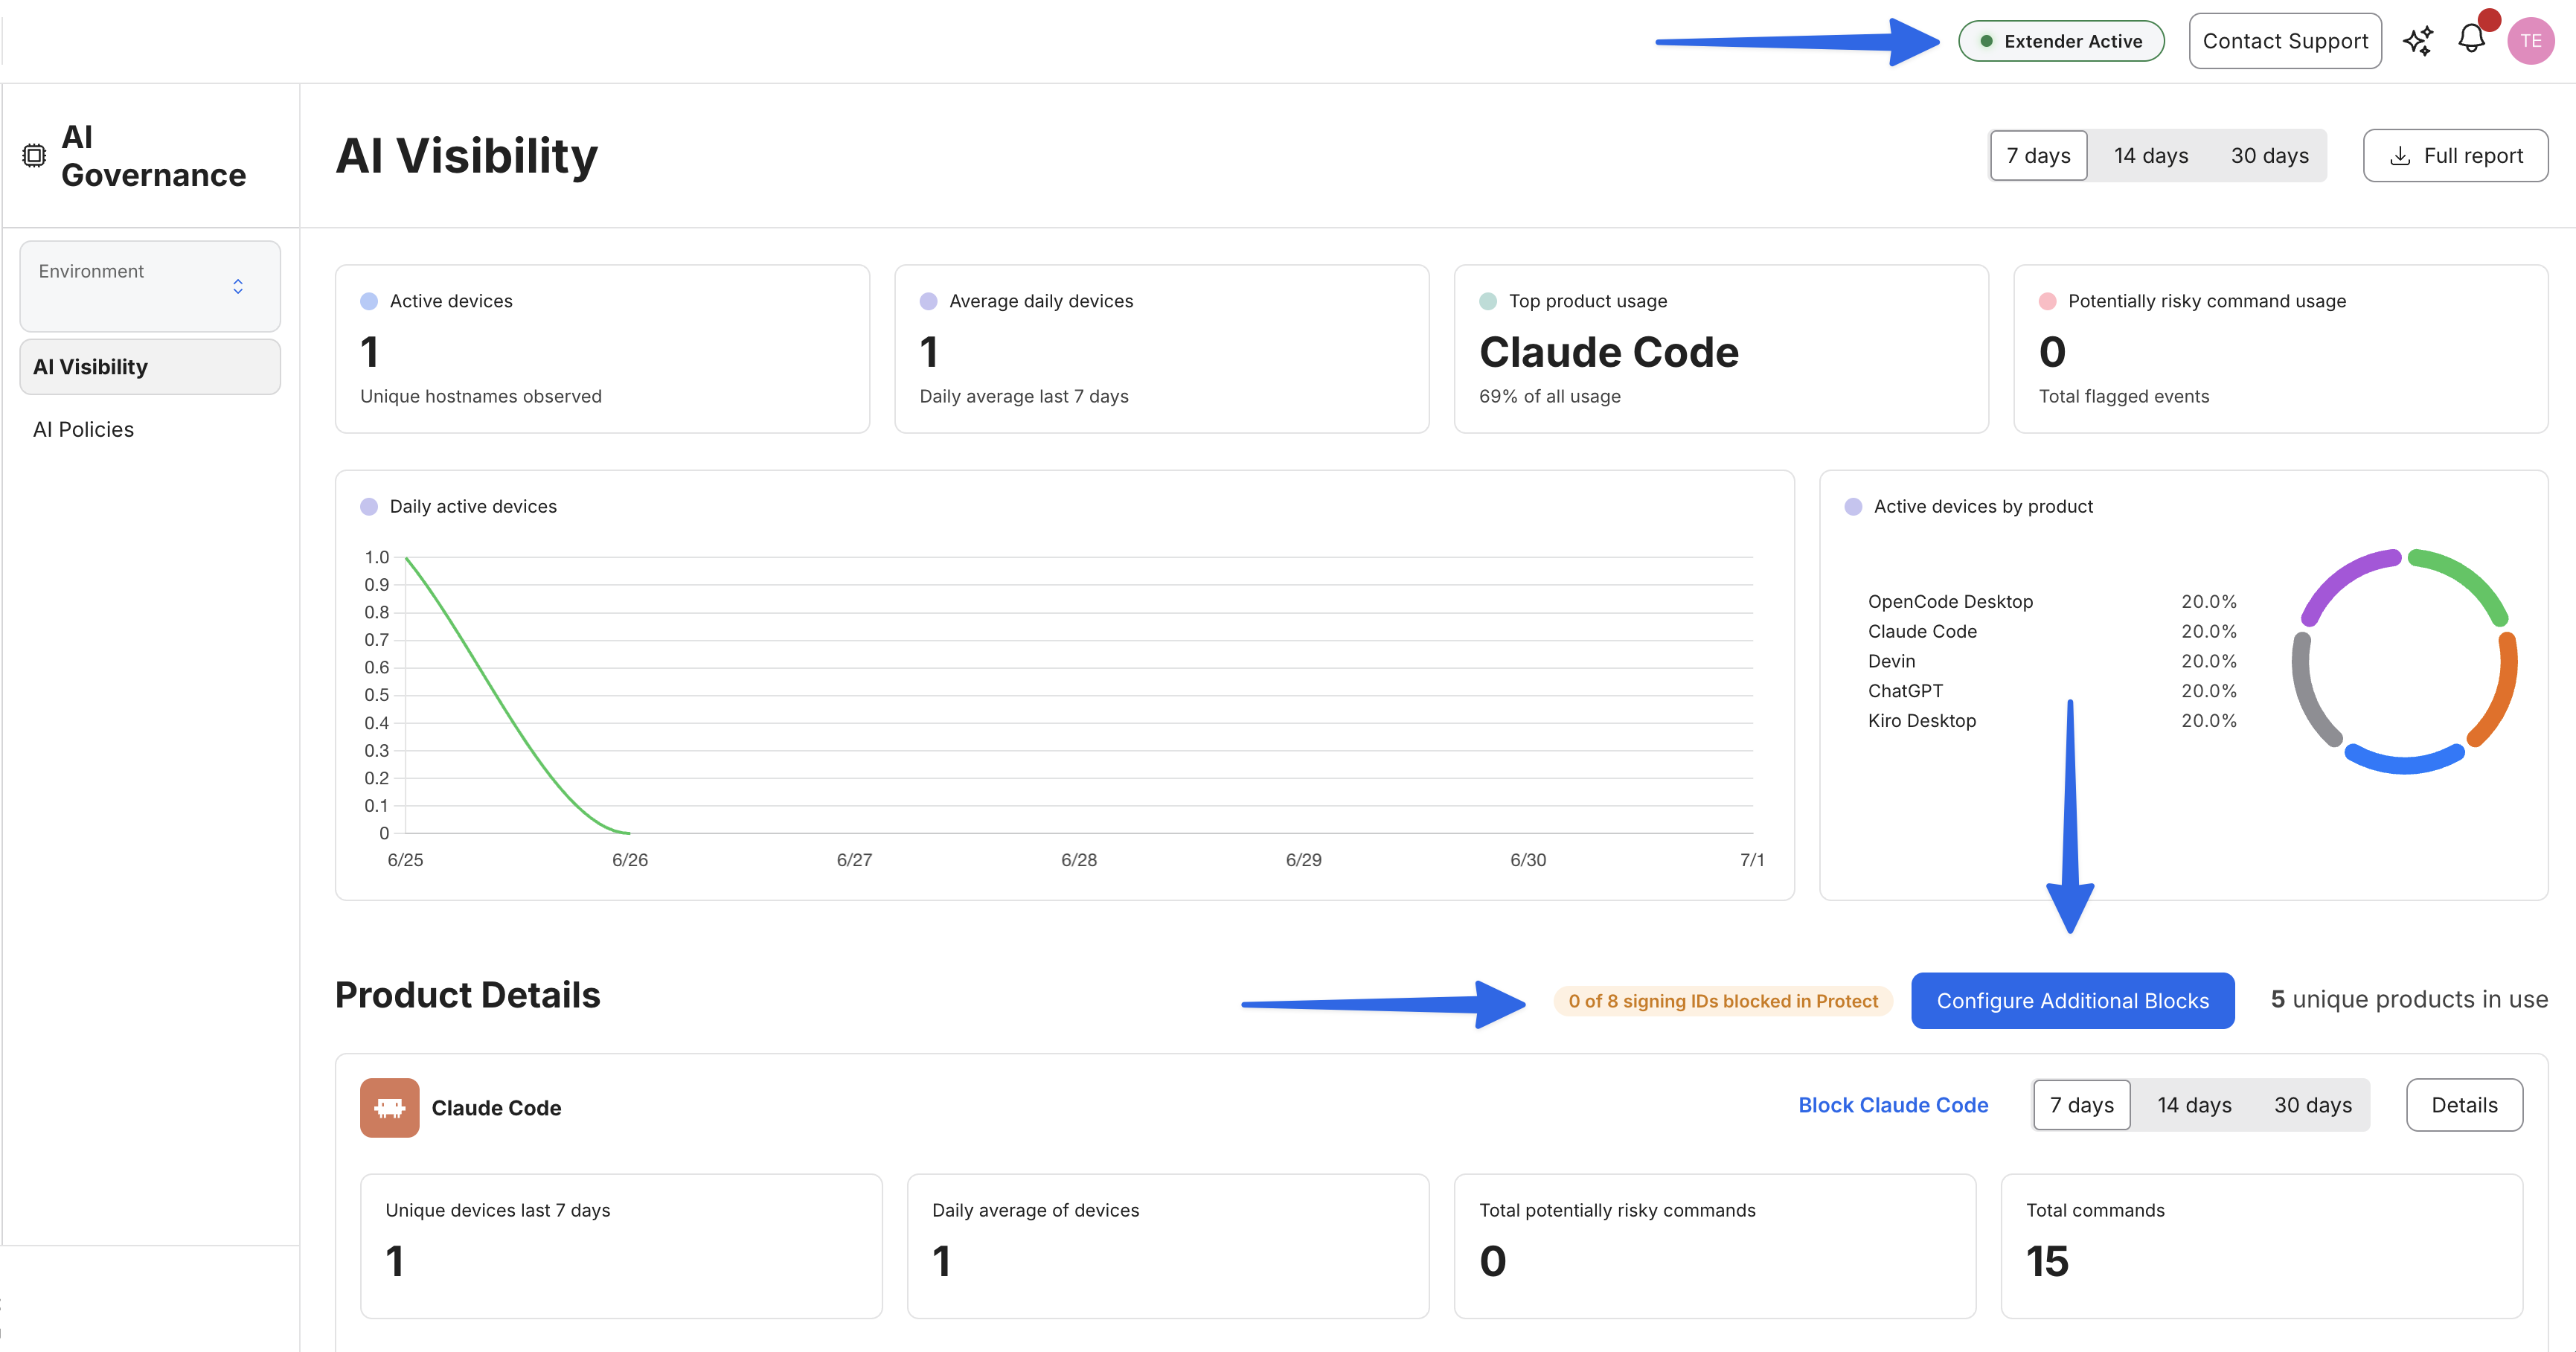
Understand Block Status Indicators
Jamf Extender injects real-time status indicators showing what's already blocked:
Before clicking anything, look for:
- Green pill next to products: "✓ Block Configured in Protect"
- Green pill next to processes: "✓ Block Configured"
- Header summary pill:
- "✓ All prevent lists configured (N)" — Everything is blocked
- "N of M signing IDs blocked in Protect" — Partial coverage
These indicators appear automatically — no configuration needed. They check your Protect instance in real-time. They can take a few moments to show up on first load.
Deploy Blocks (All Products)
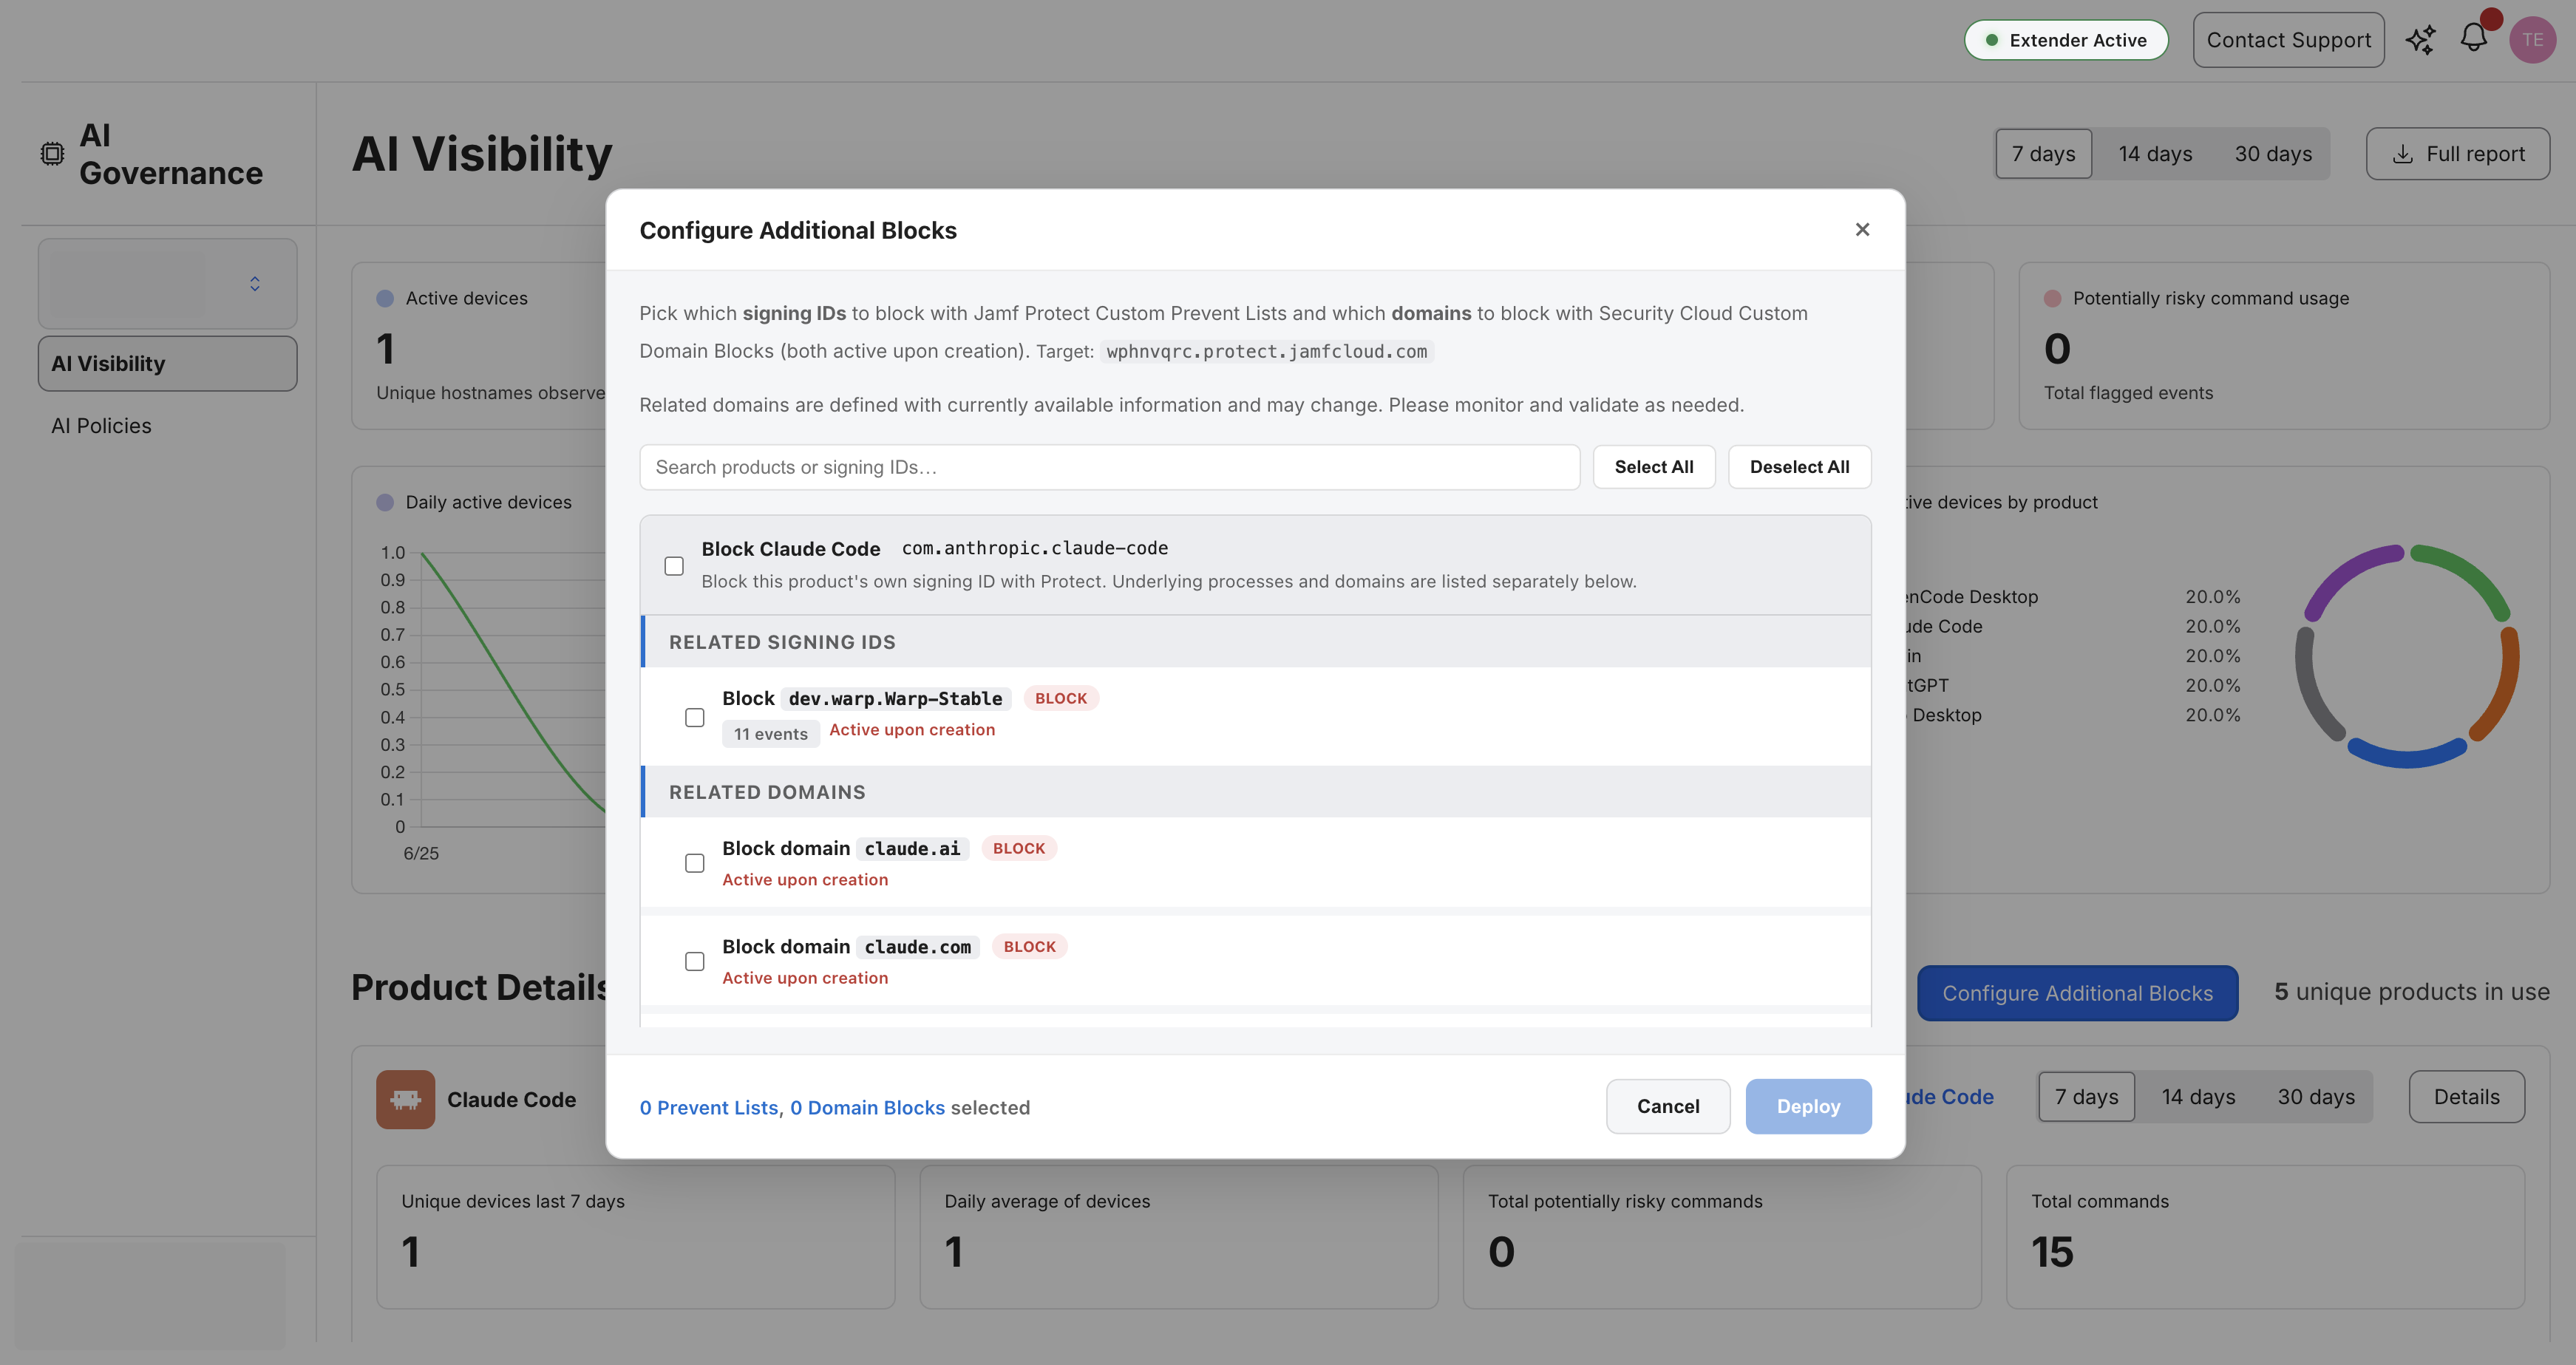
To block all AI tools detected on the page:
Click "Configure Additional Blocks" button
- Located LEFT of "N unique products in use" count
- Covers ALL products on the page
Credential Check (Happens Automatically):
- Extension resolves your Protect instance from the environment UUID
- Checks if credentials are write-capable (not read-only)
- If read-only: Shows error with setup instructions
- If ready: Opens deployment modal
Select What to Block:
Custom Prevent Lists:
- Products are grouped with checkboxes
- Each product has:
- ☐ Product bundle ID checkbox (e.g.,
com.anthropic.claudefordesktop) - ☐ One checkbox per launcher/command signing ID ✅ Key Points:
- ☐ Product bundle ID checkbox (e.g.,
- Checking header checkboxes will check all sub-checkboxes
- Sub-checkboxes are INDEPENDENT
- Nothing is checked by default
- Already-blocked IDs show green "Already blocked" badge
Custom Domain Blocks:
- (If Security Cloud is configured in Portal Group)
- Each product shows its known domains
- Check domains to block (e.g.,
claude.ai,claude.com) - Domain blocks apply to macOS, iOS, iPadOS, VisionOS, Android, and Windows endpoints
Click "Deploy"
Results:
- Success count: "Created N Prevent Lists, Skipped M duplicates"
- Any already-existing entries are automatically skipped
- Prevent Lists are immediately active in all deployed Plans
Buttons will be present on the final screen to go directly to Protect or Security Cloud to see blocks that were added
Deploy Blocks (Single Product)
To block just one AI tool:
- Find the product card (e.g., "Claude")
- Click "Block {Product}" link
- Located in the card's control cluster (next to day range selection)
- Follow same deployment flow as above (scoped to that product only)
Buttons will be present on the final screen to go directly to Protect or Security Cloud to see blocks that were added
Verify Deployment
In Jamf Protect:
- Go to: Configuration → Prevent Lists
- Look for new entries named like:
- "Block AI Tool: com.anthropic.claudefordesktop"
- "Block AI Tool: com.openai.chatgpt.atlas"
- Each has:
- Type: Custom Prevent List
In Jamf Security Cloud:
- Go to: Policies → Content filtering policy → Custom rules
- Look for new custom domain blocks
- Verify domains are listed and assigned to the groups you need them to be assigned to
Back in AI Visibility:
- Refresh the page
- Green "✓ Block Configured" badges should appear next to deployed items
Best Practices
1. Use Descriptive Portal Group Names
Good names: "Production", "Dev - US East", "QA Environment"
Bad names: "Test", "Group 1", "asdf"
Why: You'll have multiple Portal Groups if you manage multiple environments.
2. Monitor Prevent List Effectiveness
After deployment:
- In Jamf Protect: Alerts → View All
- Filter by: Prevent List blocks
- Check that AI tools are actually being blocked
Why: Validates your deployment is working in production.
3. Allowing Exceptions
To allow a specific AI tool (e.g., Claude for developers):
Option 1 - Don't Deploy Its Blocks:
- Simply don't check its boxes when deploying
- Other tools get blocked, this one stays open
Option 2 - Remove Prevent Lists:
- In Jamf Protect: Configuration → Prevent Lists
- Find the "Block AI Tool: com.anthropic.claudefordesktop" list
- Delete it
- Tool is now allowed
- In Jamf Security Cloud → Policies → Content filtering policy → Custom rules
- Remove any rules that are no longer necessary
Part 2: Windows AI Policy Deployment (Optional)
Beyond blocking AI tools at the network and process level, you can also deploy policy configurations directly to AI applications on Windows endpoints. This is particularly useful for organizations that need to:
- Configure AI tools with organization-approved settings (e.g., approved models, API endpoints, feature flags)
- Enforce consistent configurations across Windows fleets via MDM
- Deploy Claude Code or Claude Desktop with managed settings
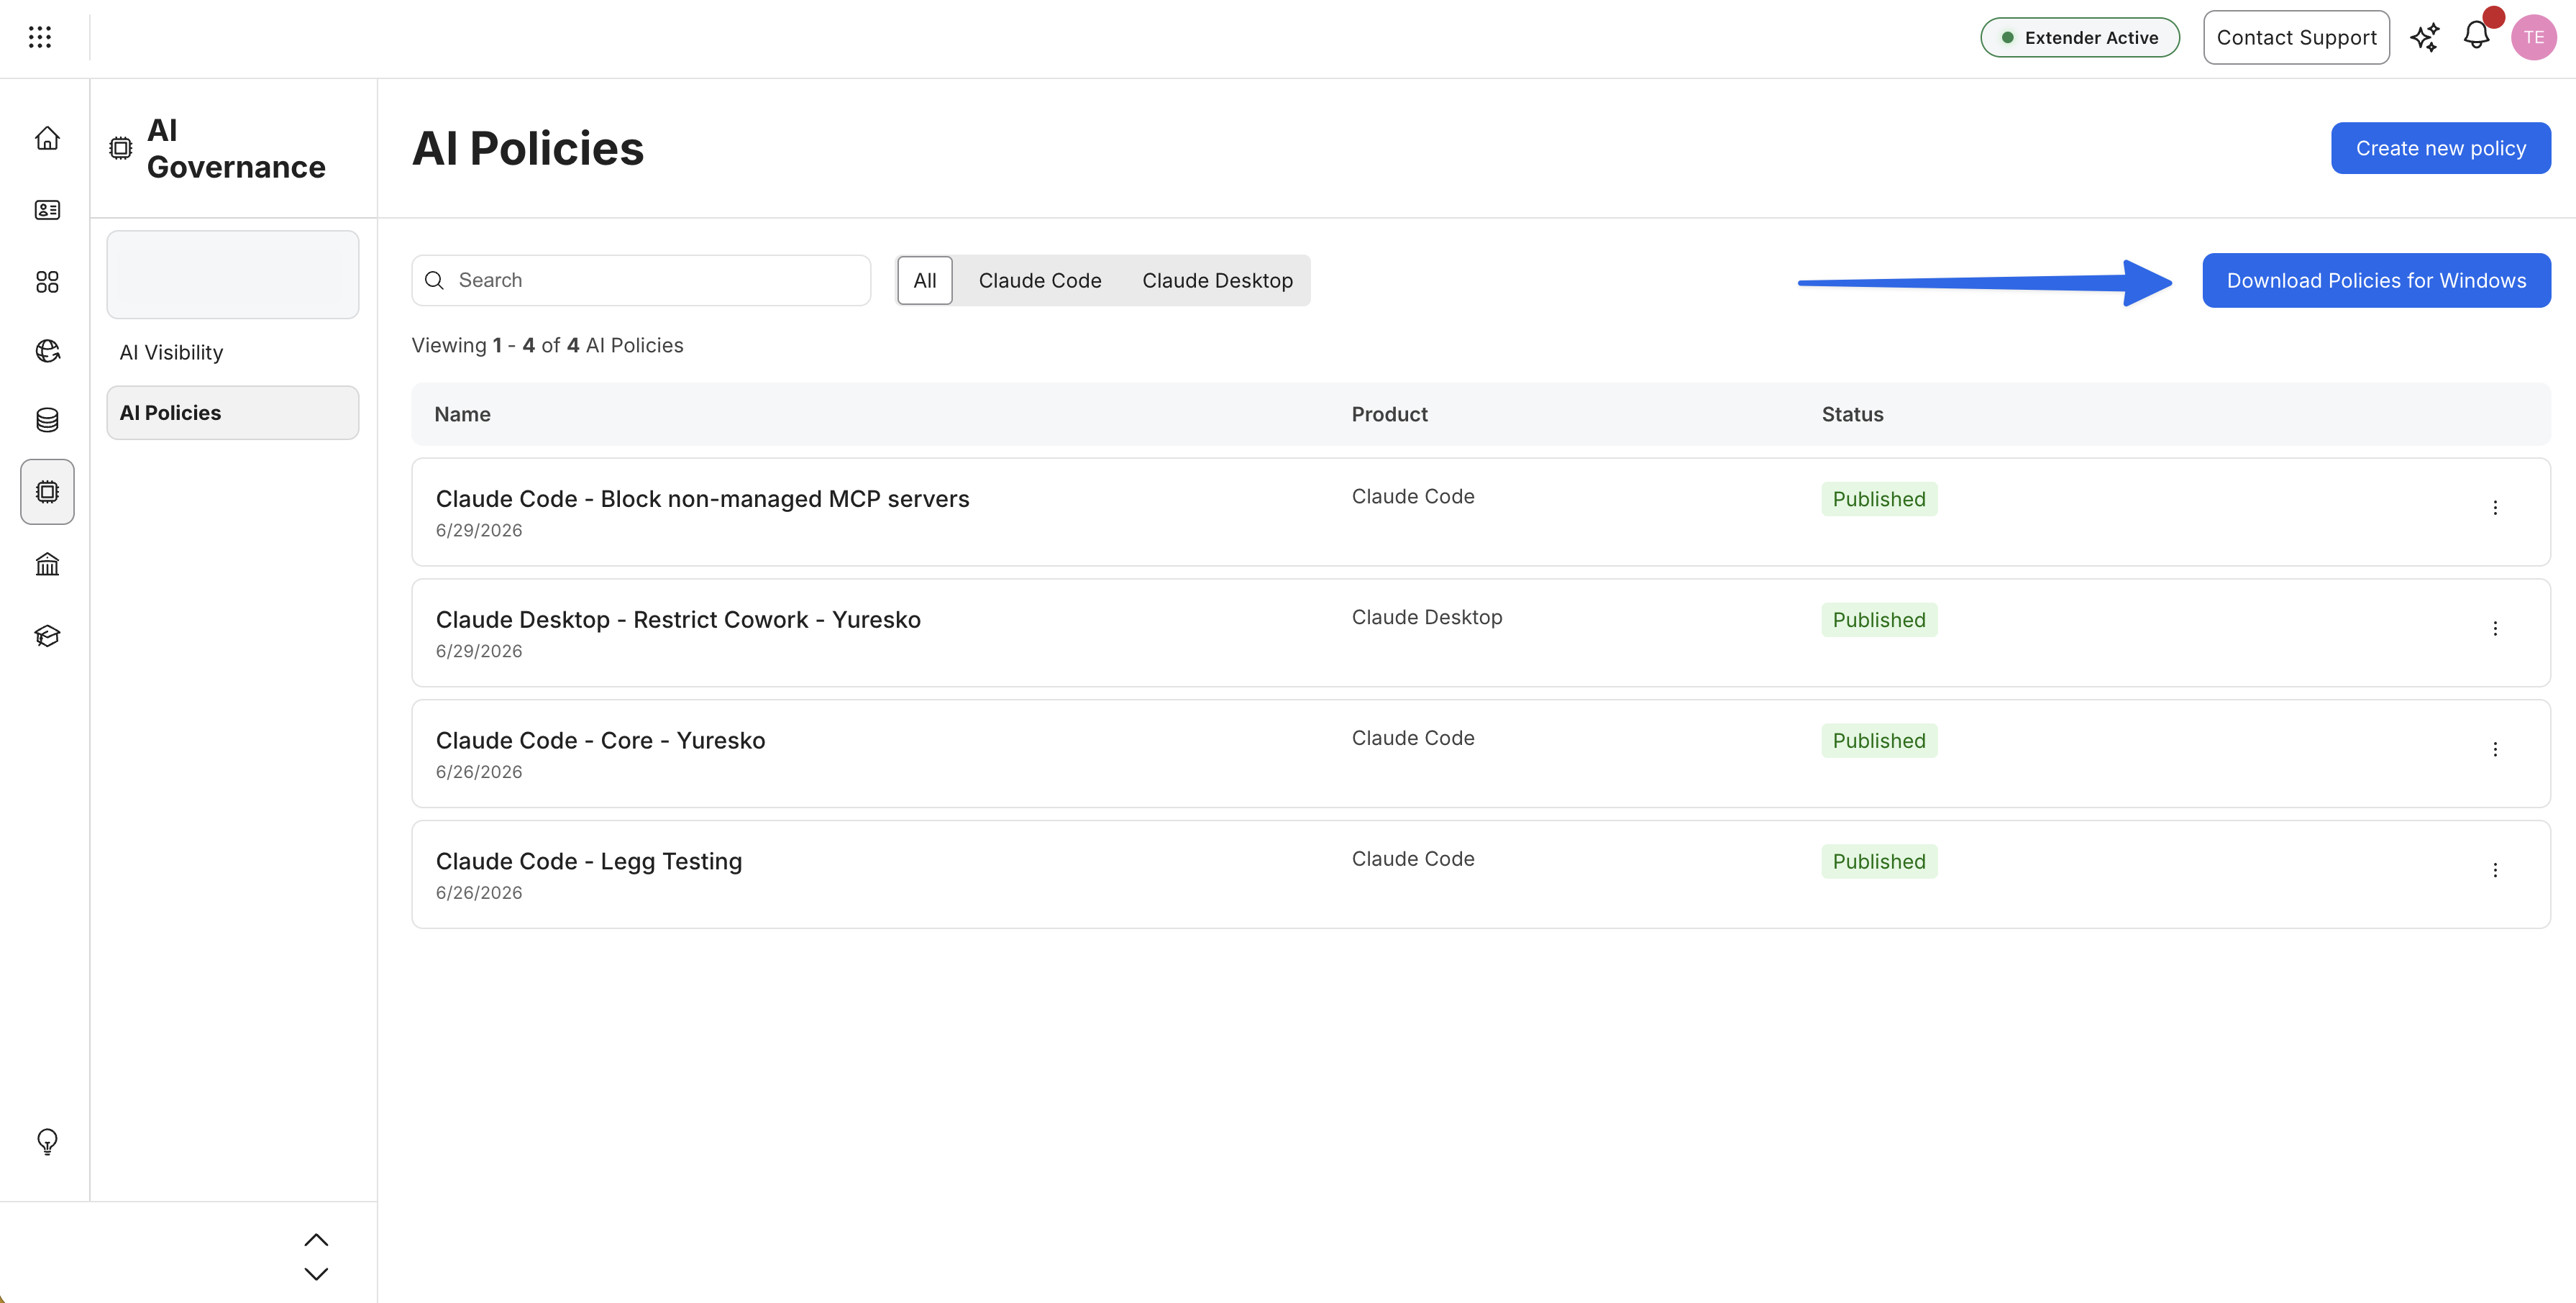
What Gets Deployed
Jamf Extender generates Windows deployment bundles that write policy configurations to the Windows Registry:
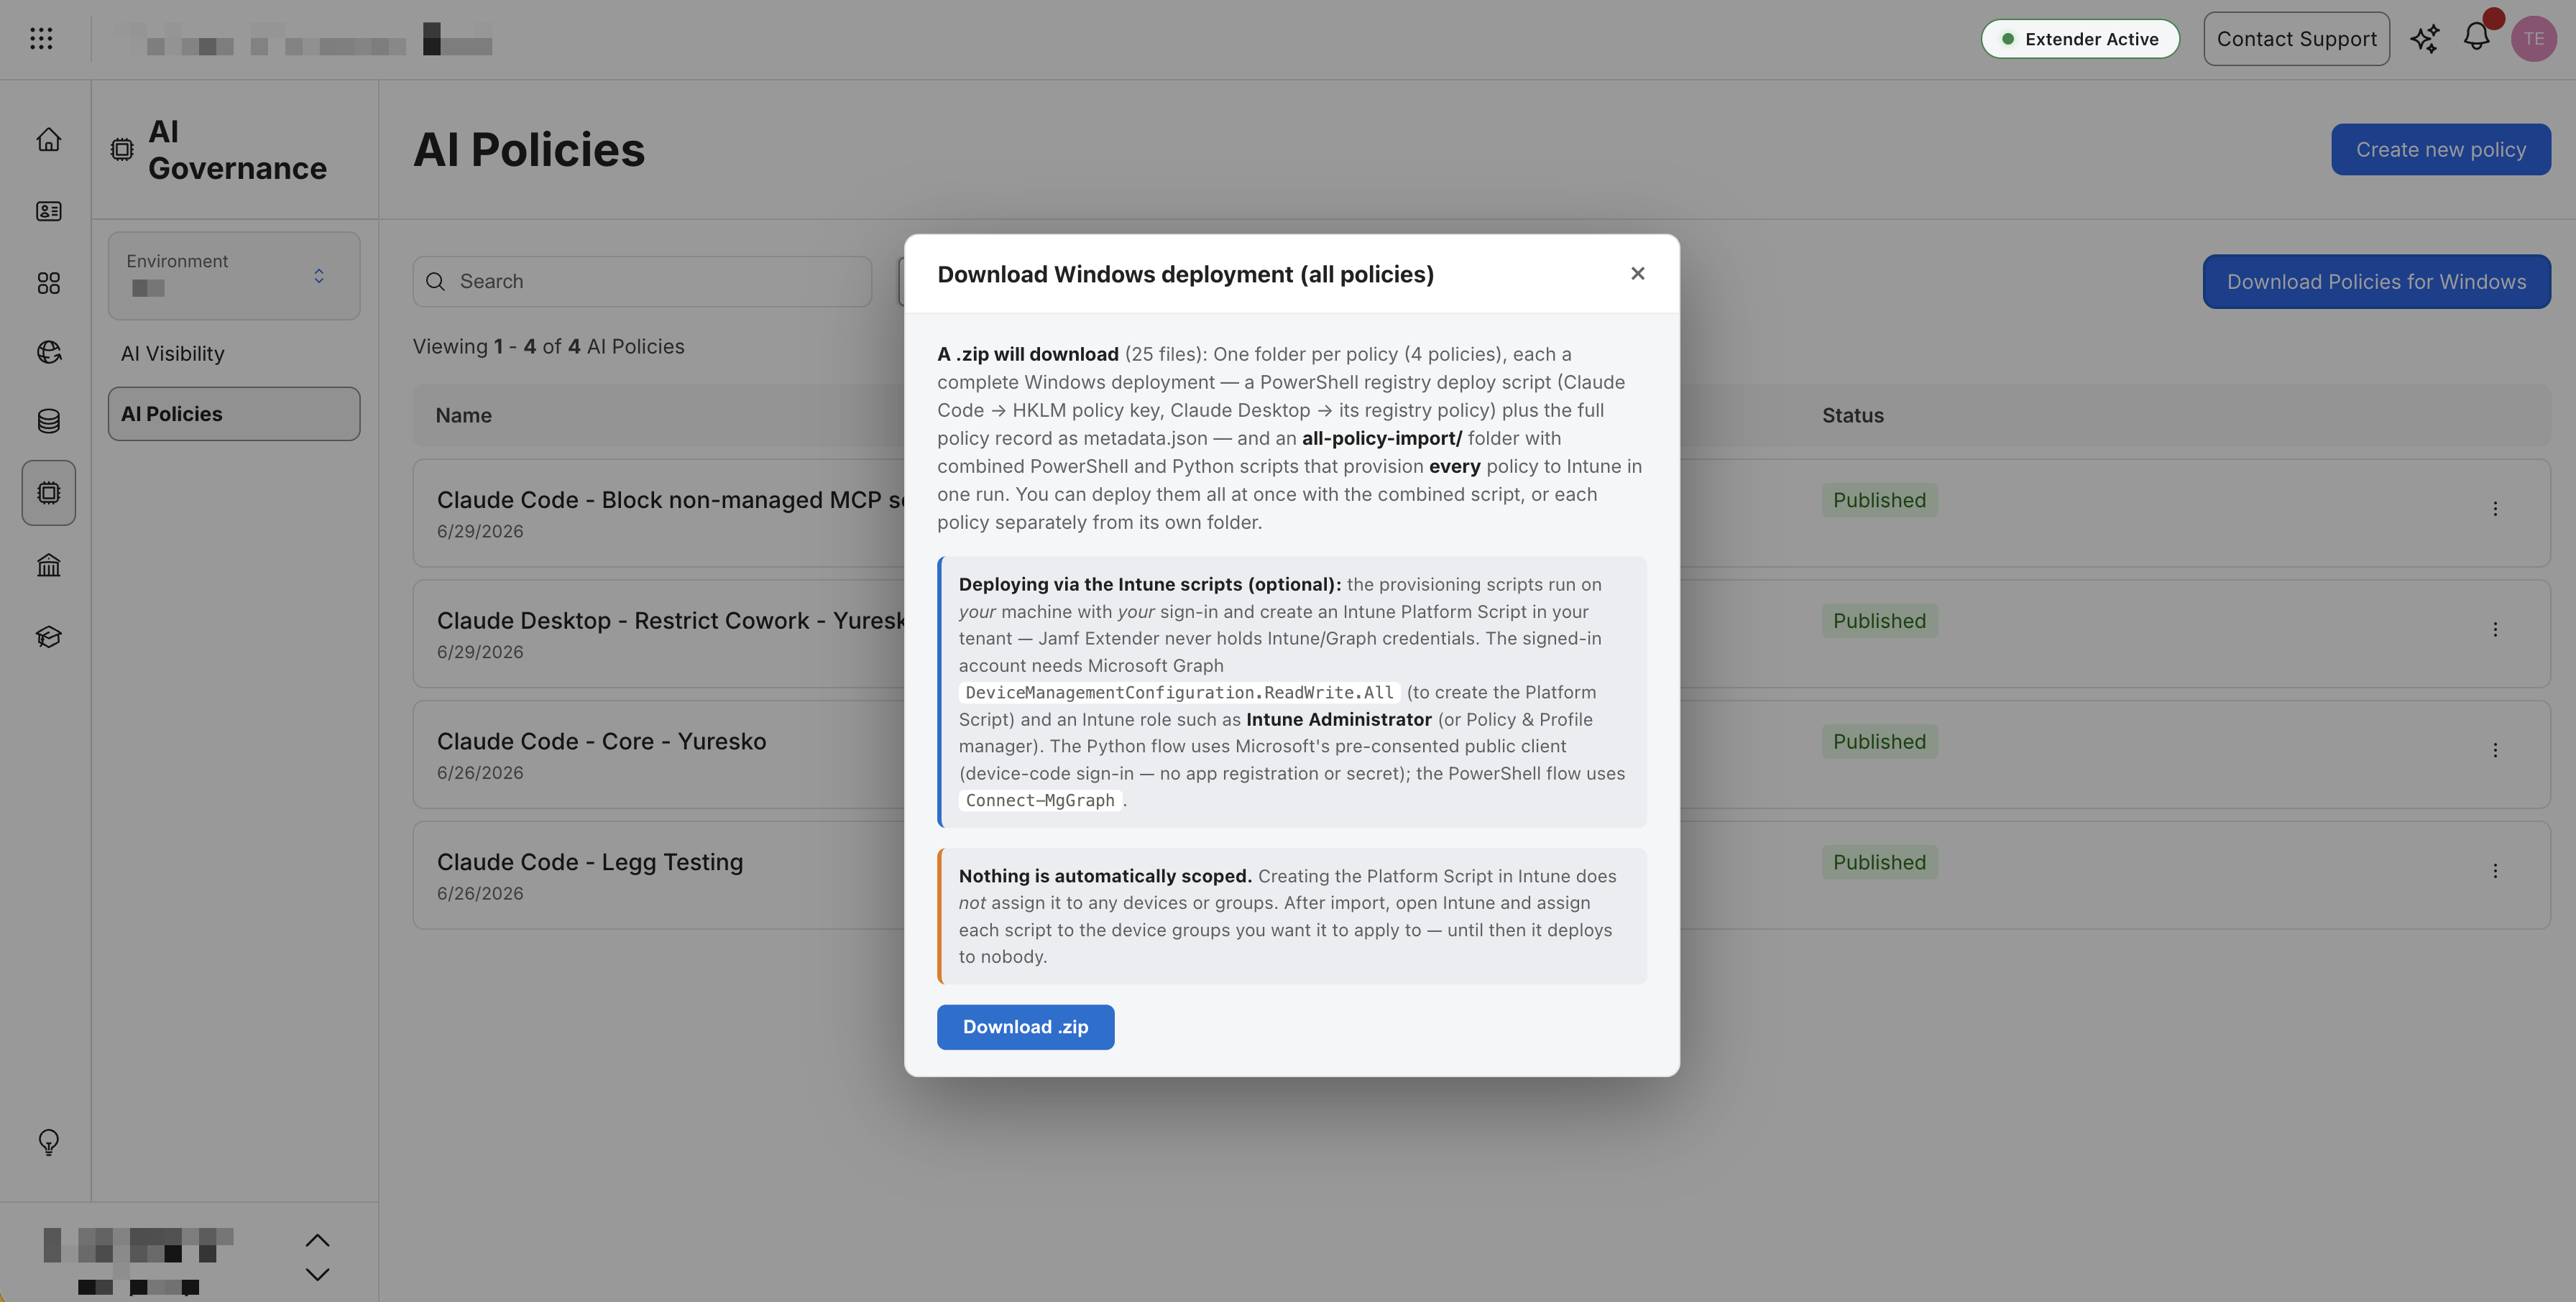
Claude Code:
- Registry path:
HKLM\SOFTWARE\Policies\ClaudeCode\Settings - Format: Single compressed JSON string containing all settings
- Deployed via: PowerShell script that validates and writes registry value
Claude Desktop (Claude Cowork):
- Registry path:
HKLM\SOFTWARE\Policies\Claude - Format: One registry value per setting key (e.g.,
model,temperature) - Deployed via: PowerShell script that writes individual string values
Export a Policy for Windows
Navigate to AI Policies:
- Go to: AI Governance → AI Policies in Jamf Account
- Find the policy you want to deploy to Windows
Export Single Policy:
- Click the three-dot menu (⋯) next to the policy
- Select "Export for Windows"
- Browser downloads a ZIP file named like:
claude-code-windows-deploy.zip
Or Export All Policies (Bulk):
- Click "Download Policies for Windows" in the toolbar
- Browser downloads:
ai-policies-windows-deploy.zip - Contains separate deployment folders for each policy
Understanding the Bundle Structure
Each policy export contains:
claude-code-windows-deploy/
├── Deploy-ClaudeCode-Registry.ps1        # Device-side registry writer
├── intune/
│   ├── Provision-ClaudeCode-Intune.ps1   # Admin provisioner (PowerShell)
│   └── provision_claudecode_intune.py    # Admin provisioner (Python/MSAL)
├── metadata.json                          # Source policy details
└── README.txt                             # Setup instructions
For Claude Desktop policies, you'll also see:
settings/settings.json # Reference copy of settings
For bulk exports:
ai-policies-windows-deploy/
├── policy-1/                              # One folder per policy
│   ├── Deploy-ClaudeCode-Registry.ps1
│   └── intune/...
├── policy-2/
│   ├── Deploy-ClaudeDesktop-Registry.ps1
│   └── intune/...
├── all-policy-import/
│   ├── Import-All-AIPolicies-Intune.ps1   # Multi-policy provisioner
│   └── import_all_aipolicies_intune.py    # Multi-policy provisioner
└── metadata.json                          # Index of all policies
Deployment Option 1: Any MDM (Manual Script Execution)
The device-side scripts (Deploy-*.ps1) work with any MDM that can execute PowerShell scripts.
Steps:
- Extract the ZIP bundle
- Review
Deploy-ClaudeCode-Registry.ps1orDeploy-ClaudeDesktop-Registry.ps1 - Upload the script to your MDM (Intune, Workspace ONE, etc.)
- Assign to Windows device groups
- Script runs as SYSTEM and writes to registry
What the Script Does:
- Embeds the policy JSON directly in the script
- Validates JSON syntax with
ConvertFrom-Json(fails fast on errors) - Creates registry key if it doesn't exist
- Writes settings to appropriate registry path
- Exits with code 0 (success) or 1 (failure)
Supported MDM Tools:
- Microsoft Intune (Platform Scripts)
- VMware Workspace ONE (Scripts & Sensors)
- Any MDM that can execute PowerShell as SYSTEM context
Deployment Option 2: Microsoft Intune (Automated Provisioning)
The Intune provisioners automate the process of uploading scripts to Microsoft Intune via Microsoft Graph API.
Choose Your Provisioner:
PowerShell Provisioner (Provision-*-Intune.ps1)
Prerequisites:
- Windows machine with PowerShell 5.1+
- PowerShell Microsoft.Graph module installed:
Install-Module Microsoft.Graph - Entra ID Global Administrator or Intune Administrator role
Steps:
- Extract the ZIP bundle
- Navigate to:
intune/ - Right-click
Provision-ClaudeCode-Intune.ps1→ Run with PowerShell - Review confirmation prompt showing:
- Policy name and version
- Required Intune permissions
- What will be created in Intune
- Type
Yto confirm - Browser opens for interactive Microsoft login (supports MFA)
- Script authenticates and uploads the device-side script to Intune
- Script outputs: Intune Platform Script ID and success confirmation
Next Steps in Intune Portal:
- Go to: Devices → Scripts and remediations → Platform scripts
- Find your newly created script (e.g., "Claude Code Policy v1")
- Click Assignments → Add device groups
- Devices in those groups will receive the policy on next check-in
Python/MSAL Provisioner (provision_*_intune.py)
Why Use Python?
- Works on Windows, macOS, or Linux
- No app registration required
- Uses OAuth device-code flow (browser-based, works with MFA)
- No secrets to manage
Prerequisites:
pip install msal requests
Steps:
- Extract the ZIP bundle
- Navigate to:
intune/ - Run:
python provision_claudecode_intune.py - Review confirmation prompt
- Type
yesto confirm - Script prints: "Go to https://microsoft.com/devicelogin and enter code: XXXXXX"
- Open browser, enter code, sign in with Intune admin account
- Script completes upload
- Assign to device groups in Intune Portal (same as PowerShell flow)
Advantages:
- Cross-platform (no Windows required)
- Zero app registration overhead
- Browser-based authentication (familiar MFA flow)
- Open-source dependencies only
Bulk Policy Deployment (Multiple Policies at Once)
For organizations managing multiple AI policies:
Using the All-Policy Provisioner:
- Extract
ai-policies-windows-deploy.zip - Navigate to:
all-policy-import/ - Run either:
- PowerShell:
Import-All-AIPolicies-Intune.ps1 - Python:
python import_all_aipolicies_intune.py
- PowerShell:
- Single authentication flow uploads all policies
- Each policy becomes a separate Intune Platform Script
Result:
- Multiple Intune scripts created in one run
- Each script can be assigned to different device groups
- Useful for deploying different configurations to different teams (e.g., engineering vs. marketing)
Verify Windows Deployment
On a Test Device:
- Open Registry Editor (
regedit.exe) - Navigate to:
- Claude Code:
HKEY_LOCAL_MACHINE\SOFTWARE\Policies\ClaudeCode - Claude Desktop:
HKEY_LOCAL_MACHINE\SOFTWARE\Policies\Claude
- Claude Code:
- Verify registry values exist
For Claude Code:
- Look for a value named
Settings(REG_SZ) - Value contains compressed JSON (no newlines)
For Claude Desktop:
- Multiple values, one per setting key
- Each value is a string (even for booleans/numbers)
- Launch the application (Claude Code or Claude Desktop)
- Verify settings are enforced (e.g., model selection, API endpoints)
Troubleshooting:
- If registry values are missing: Check MDM script execution logs
- If app ignores settings: Ensure app version supports managed registry settings
- If script fails: Check
metadata.jsonfor validation errors
Schema Validation (Claude Code Only)
Claude Code policies are validated against the official JSON schema before deployment:
Validation Happens At:
- Export time (in Jamf Extender)
- Script execution time (device-side PowerShell validates JSON syntax)
What's Validated:
- Type mismatches (e.g., string where boolean expected)
- Invalid enum values (e.g., unsupported model names)
- Unknown configuration keys
- Environment variable naming (must be uppercase, alphanumeric + underscores)
Errors Are Shown:
- In the browser during export (blocks download if critical errors)
- In
README.txtafter export (warnings only) - In PowerShell script output (JSON parse failures)
Claude Desktop:
- No published schema (deployed as-is)
- Admins responsible for validating settings against Claude Desktop documentation
Windows Deployment Best Practices
1. Test Before Production
- Deploy to a pilot device group first
- Verify registry values are written correctly
- Test application behavior with managed settings
2. Version Your Policies
- Policy version is embedded in Intune script name (e.g., "Claude Code Policy v2")
- Updating a policy creates a new version
- Old versions remain in Intune unless manually deleted
3. Use Descriptive Policy Names
- Good: "Claude Code - Engineering Team - GPT-4 Only"
- Bad: "Policy 1", "Test", "asdf"
- Policy name appears in Intune Platform Script list
4. Keep Credentials Secure
- Intune provisioners use interactive auth (no credentials embedded)
- Device-side scripts contain only policy JSON (no secrets)
- Never commit extracted bundles to source control if they contain sensitive settings
5. Review Before Deployment
- Always check
README.txtin the bundle - Review validation errors/warnings in metadata
- Test PowerShell script syntax on a dev machine before MDM upload
Windows Deployment Limitations
What This Does NOT Do:
- Does not install Claude Code or Claude Desktop (requires separate deployment)
- Does not block AI tools at the process level (use Jamf Protect for that)
- Does not work on macOS (use macOS MDM profiles or file-based settings)
- Does not deploy to Linux endpoints
Registry-Only:
- File-based settings (e.g.,
settings.jsonin app directories) are NOT written - Applications must read from registry policy locations
- Verify your app version supports registry-based managed settings
Support & Feedback
- GitHub Issues: https://github.com/Jamf-Concepts/jex/issues
- Documentation: https://github.com/Jamf-Concepts/jex
- Questions: Open an issue with the "question" label
If you discover signing IDs for unknown tools:
- Run:
codesign -dv /Applications/YourApp.app - Capture: Bundle ID, Team ID, domains
- Submit GitHub issue with validation report attached
Your contribution helps the entire Jamf community!